
Can You Use Cast Iron on Induction? A Complete Guide
If you’re eyeing a new induction cooktop, you might worry about your cast iron collection gathering dust. Good news: your cast iron works beautifully on induction, but a few key practices will keep it performing its best.
Based on my experience restoring and cooking with cast iron on induction, here’s what I’ll cover to get you started right:
- How to perform the simple magnet test to confirm your pan will work.
- Why preheating correctly is critical for even cooking on an induction hob.
- How induction’s intense heat affects your seasoning and what to do about it.
- Practical tips for moving and cleaning your pan to prevent surface scratches.
How Induction Works with Cast Iron (The Simple Version)
An induction cooktop doesn’t have a hot coil or glowing element you can see. Instead, it uses electricity to create a powerful, invisible magnetic field right under its glass surface.
When you place a compatible pan on that spot, the magnetic field grabs the iron atoms inside your pan and makes them vibrate extremely fast. Think of it like rubbing your hands together very quickly to create heat from friction. That rapid vibration is what generates heat directly inside the pan itself.
The cooktop doesn’t get hot to heat the pan; the pan gets hot because the cooktop excites its iron molecules.
This magnetic field only interacts with ferrous metals, meaning metals that contain iron and are magnetic. This is where cast iron shines. Your skillet is essentially a big chunk of magnetic metal. The induction field latches onto it perfectly, making heat generation incredibly efficient. That efficiency is exactly why many cooks choose cast iron as their go-to skillet. For a complete guide to why use cast iron skillet and its benefits and advantages, stay tuned.
Nearly every plain, uncoated cast iron skillet or Dutch oven you own is automatically induction-ready because it’s made of magnetic iron. This directly answers the core question: yes, cast iron pans are fundamentally compatible with induction technology. If you’re looking at cast iron Dutch oven types, there are several with distinct uses. Knowing them helps you choose the right one.
What Makes a Pan Work on Induction?
The rule is simple: if a magnet sticks strongly to the bottom of the pan, it will work on an induction cooktop. The pan itself must be the source of the magnetism.
This is why common cookware materials fail the test:
- Aluminum (like many modern pots)
- Copper
- Glass or ceramic
These materials aren’t magnetic. Some manufacturers add a magnetic stainless steel plate to the bottom of such pans to make them “induction compatible,” but that’s a workaround. Cast iron is the original, natural fit.
What about enameled cast iron, like those colorful Dutch ovens? The iron body is still magnetic. As long as the enamel coating on the bottom isn’t overly thick or made with non-magnetic materials, the magnet should still stick and the pan will work. Always perform the magnet test to be sure.
How to Test if Your Cast Iron Pan is Induction-Ready
You don’t need to guess or search for a tiny induction logo. The definitive answer for whether all cast iron pans are induction safe sits on your refrigerator.
The trusty fridge magnet test never lies. A strong, insistent pull means your pan is ready for induction. A weak hold or no hold at all is a clear no. I’ve used this test on every piece in my collection, from a brand-new skillet to a hundred-year-old find.
The Fridge Magnet Test: A Step-by-Step Check
- Grab a standard refrigerator magnet. The kind that holds a takeout menu is perfect.
- Make sure your pan is clean and dry.
- Press the magnet firmly against the center of the pan’s cooking surface inside. Feel for a strong, secure hold.
- Then, test the center of the pan’s flat bottom on the outside. You should feel the same strong pull.
If the magnet grips firmly in both places, your cast iron pan is 100% induction-ready. You’re good to go. This test works on any cookware, instantly demystifying what will or won’t work on your cooktop. For the full cast iron induction cooktops complete compatibility usage guide, see the next steps.
What If the Magnet Doesn’t Stick?
This is very rare with cast iron, but it can happen. Some antique pans, particularly those with very high silicon content, can be less magnetic. Certain composite or novelty “cast” items might not be pure iron.
If your magnet slides right off, that specific pan won’t work directly on an induction burner.
Your last-resort option is an induction disc adapter, sometimes called a cast iron induction cooking adapter. This is a flat, magnetic steel plate you heat on the cooktop, and then you set your non-magnetic pan on it. I only recommend this as a temporary fix because it’s inefficient-you lose direct control and it heats slowly, much like using an electric coil. It’s better to find a truly compatible pan.
Using Your Cast Iron on an Induction Cooktop: A Practical Guide
Induction cooking is a different beast than gas or electric coils. The heat is instant, direct, and concentrated right under your pan. This is fantastic for control, but it demands a slight shift in how you handle your cast iron. These core practices will keep both your prized pan and your glass cooktop in perfect shape.
Start with a Clean, Dry Bottom
This step is non-negotiable for induction. On a gas burner, a little oil splatter on the pan’s underside just burns off. On a smooth glass induction surface, that same residue bakes into a stubborn, ugly film that’s a pain to scrape off later.
Before you even think about turning on the burner, wipe the entire bottom of your skillet with a dry paper towel. Check for any tiny food bits or dust from storage. I give my favorite #8 skillet a quick visual and tactile inspection every time. A perfectly clean, bone-dry base is your first line of defense for keeping your cooktop spotless.
Master the Pre-Heat: Low and Slow Wins
This is the most important habit to learn. Induction heats a compatible pan with startling speed. Cranking it to high right away is like asking your cast iron to go from a cold car to a sprint-it can cause thermal shock. This uneven, rapid expansion is what leads to warping or, in rare cases, cracks.
Instead, treat the pre-heat like a gentle warm-up. Place your pan on the burner and set it to a medium-low power level (think a 3 or 4 out of 10). Let it sit there for a solid 2 to 3 minutes. You’ll feel the heat gradually spreading through the iron. Starting low and slow gives the entire pan time to heat evenly, preventing stress and protecting its flat, cooking surface.
Lift, Don’t Slide
Cast iron is famously durable, but its surface can be micro-abrasive. When you slide a heavy cast iron cookware pans across a glass cooktop, it acts like fine sandpaper. Even a small grain of salt trapped underneath can leave a visible, permanent scratch.
The rule is simple: always lift the pan to move it. Get a good grip on the handle, pick it straight up, then place it down where you want it. This also protects your seasoning from getting scuffed by the cooktop surface. Making a habit of lifting, not sliding, preserves the finish on both your expensive appliances.
Finding the Right Heat Settings
You’ll rarely need the maximum power setting. Induction is so efficient that medium heat is often more than enough. Here’s a reliable starting point:
- For searing steaks or frying: Start at your pre-heat level (3-4), then increase to a medium setting (5-6). This usually provides all the heat you need.
- For simmering sauces or cooking eggs: A low setting (2-3) is ideal.
Remember, induction changes temperature the moment you adjust the dial. There’s no lingering “coil glow” to cool down. Because the response is instant, you should lower the heat a minute or so before you think you need to, especially for delicate tasks. It takes a little practice, but the precision you gain is worth it.
Does Induction Cooking Hurt Your Cast Iron Seasoning?
If you’ve spent any time on cast iron forums, you’ve seen the worry. Someone posts a picture of a flaky patch on their skillet and asks, “Is my induction burner ruining my seasoning?” The short answer is no, not inherently. Induction cooking does not magically damage a well-maintained layer of polymerized oil. The real issue isn’t the induction technology itself, but how its unique heat delivery interacts with your technique.
Think of your seasoning like a sturdy coat of paint on a metal shed. A steady, even warmth from the sun won’t hurt it. But holding a blowtorch on one small spot? That concentrated heat can cause problems. Induction works by creating a magnetic field that heats only the pan directly above the element. If you use a small, powerful burner with a large pan, or crank the heat to maximum immediately, you create an intense hot spot. That localized thermal stress can cause thin or weak seasoning to crack or flake off, much like paint bubbling over a hotspot on that shed.
I learned this with my own large griddle. On my old electric coil stove, heat spread slowly. On my new induction cooktop, I once turned a front burner to high to sear a steak, and the center of the griddle got scorching hot while the edges were still relatively cool. The seasoning in that super-heated circle looked dry and chalky afterward. It didn’t ruin the pan, but it needed a touch-up. Induction requires more attention to heat settings and pan placement to protect your hard-earned patina.
Choosing the Right Oil for the Job
Because induction can generate intense, focused heat, your choice of seasoning oil becomes more important. You want an oil with a high smoke point. The smoke point is the temperature at which an oil starts to break down and smoke. When you season, you are intentionally polymerizing the oil just below this point. A higher smoke point gives you a wider safety margin against burning the oil instead of curing it, which is key on a powerful induction burner.
For building or repairing a base layer of seasoning on induction, I reach for one of these high-performance oils every time:
- Avocado Oil: My personal favorite for this job, with a smoke point around 520°F. It creates a very hard, durable layer.
- Grapeseed Oil: Another excellent choice, smoking at about 420°F. It’s thin and easy to apply in a microscopically thin coat.
- Refined Coconut Oil: Don’t use virgin coconut oil. The refined version has a neutral smell and a smoke point near 450°F.
Once you have a strong base, maintaining it with your usual oil (like flaxseed or crisco) is fine. But for that critical first layer that takes the direct brunt of the induction heat, starting with a high-smoke-point oil is like putting on a heat-resistant apron before working near a forge.
Avoiding Thermal Shock to Protect the Seasoning
This is the single biggest mistake I see with new induction users. Cast iron retains heat incredibly well, and induction heats it incredibly fast. The dangerous part comes when cooking is done. On a gas stove, the pan cools gradually as the flame disappears. On induction, the heat stops instantly the moment you turn off the power. The pan is still searing hot, but it’s no longer being actively heated.
Placing a piping-hot induction-heated pan directly under a stream of cold tap water is an almost guaranteed way to cause thermal shock. This sudden, drastic temperature change can make the metal contract violently. At best, this stresses and weakens your seasoning, causing spider-web cracks. At worst, it can actually crack the iron itself. I have a small hairline crack in an antique skillet that serves as my permanent reminder of this very error.
Instead, follow a simple cool-down ritual:
- Turn off the induction burner and move the pan to a different, cool burner or a room-temperature trivet.
- Let it sit until it’s warm to the touch, not nuclear hot. This might take 10-15 minutes.
- Then, and only then, add warm water for cleaning. Let the pan’s temperature come down gently, on its own terms.
Your seasoning is a resilient partner, but it respects the laws of physics. Letting the pan cool naturally is the kindest thing you can do for its long-term health.
Caring for Both Your Pan and Your Cooktop
Using cast iron on induction is a partnership. You need to care for both players. I think of it as a two-part routine: one for the iron pan in my hand and one for the glass surface underneath it. Neglecting either one can lead to poor performance or even damage over time. That means following safety best practices for cast iron on glass-top stoves. Lift pans rather than sliding them, and keep heat moderate to prevent damage.
Cleaning Your Induction Cooktop After Use
Your pan’s bottom will get hot enough to polymerize small amounts of oil, just like the cooking surface does. This can leave behind hardened, baked-on spots on your glass cooktop. A simple wipe with a cloth often isn’t enough.
For daily cleaning, I use a dedicated glass cooktop cleaner and a soft cloth. For those stubborn, polymerized oil spots that transfer from the pan, a single-edge razor scraper is your best friend. Hold the blade at a shallow angle and gently glide it across the glass. It sounds scary, but on a smooth glass surface, it works perfectly without scratching.
Keeping the cooktop impeccably clean isn’t just about looks. A spotless surface ensures maximum contact between the pan and the electromagnetic coil, which is how you get fast, even heating.
Inspecting Your Pan’s Cooking Surface
Induction delivers heat very directly and can be intense. When I first switched my daily driver skillet to an induction hob, I noticed I needed to check its seasoning more often.
After cooking and cleaning your pan, give the cooking surface a close look while it’s dry. You’re looking for two things: small areas where the seasoning might be flaking off, and any discolored rings or spots that could indicate a “hot spot” forming.
If you see a thin or bare patch, a quick stovetop seasoning touch-up is all you need. Here’s how I do it on my induction cooktop:
- After cleaning, place the dry pan on the cool cooktop.
- Apply the absolute thinnest layer of your preferred oil (I use grapeseed) to the cooking surface only.
- Turn the burner to a medium-low setting and let the pan heat for about 10 minutes. You’ll see the oil thin out, then begin to smoke lightly.
- Once it starts smoking, let it go for another 1-2 minutes, then turn off the heat and let the pan cool completely on the burner.
This process bakes that thin oil layer right into the existing seasoning, reinforcing it exactly where it’s needed.
Your Induction Cast Iron Checklist
Induction cooking is fast and efficient, but it demands a slightly different rhythm with cast iron. Follow this routine every time to keep your pan and cooktop in top shape, especially when using cast iron for cooking.
The Pre-Use Ritual
This quick check before heating prevents problems. I do this with my own daily driver skillet.
- Check the Bottom: Run your fingers across the cooking surface of your induction burner. Feel for any grit or old food debris. Now, feel the bottom of your cast iron pan. Any bumps, crust, or rough spots? Clean both surfaces with a damp cloth. A perfectly smooth contact is the goal.
- The “Coin Test”: Place your pan on the cooktop. It should sit without rocking. If it wobbles, the pan bottom isn’t flat enough for optimal induction contact. You can still use it, but heat may be uneven.
- Start Low and Slow: Never start on high heat. Set your burner to a low or medium-low setting to warm the pan for 2-3 minutes. This gradual warm-up lets the iron expand evenly, which is the best defense against cracking and warping.
During Cooking
You’re in control. Induction responds instantly, so your technique should too.
- Find Your “Medium”: For most tasks, a true medium setting is plenty hot. If you need more heat, increase it in small increments. Induction can scorch seasoning faster than gas if you’re not careful.
- Lift, Don’t Drag: When repositioning the pan, always lift it completely off the glass surface before setting it down elsewhere. Dragging can scratch your cooktop.
- Mind the Size: Try to use a pan that roughly matches the size of the induction coil ring marked on your cooktop. A pan that’s too small won’t heat efficiently, and one that’s massively larger can lead to hot spots.
Post-Use Care
What you do after cooking is just as important for induction compatibility.
- Let It Cool Down: Transfer your food and turn off the burner. Let the pan cool down on the stovetop until the base is warm, not scalding hot. Placing a sizzling-hot pan on a cold counter or in water is a sure way to cause thermal shock and damage.
- Clean While Warm: Once it’s comfortably warm, clean your pan as usual with hot water and a brush. Dry it immediately and thoroughly with a towel.
- Apply a Micro-Thin Coat of Oil: This is the secret. While the pan is still slightly warm from drying (not hot), put a few drops of oil on a paper towel and wipe the entire pan, inside and out. Then, take a clean, dry paper towel and buff until it looks dry. This protects the metal and the seasoning.
- Store It Right: Don’t store the pan on a damp or cold surface. I keep mine on the stove (cool) or on a cloth-lined shelf. This final step ensures the base stays flat and rust-free for its next induction date.
Straight Talk on Induction and Cast Iron: Myths vs. Facts
Let’s clear up the confusion you might find online. Induction cooking is simple science, but it gets wrapped in a lot of old wives’ tales. I’ve used my vintage skillets on induction for years, and the reality is straightforward once you separate fact from fiction.
Myth: You Need a Special “Induction” Cast Iron Pan
This is a marketing trick, not a technical requirement. Induction works by creating a magnetic field. If a magnet sticks firmly to the bottom of your pan, it will work on an induction cooktop. Every piece of cast iron I own, from a brand-new Lodge to a 100-year-old Griswold, passes the magnet test with flying colors.
You do not need to hunt for a specific “cast iron induction frying pan“; your regular cast iron is almost certainly already induction-ready. On induction stoves, a few quick compatibility tips can help. They ensure even heating and peak performance.
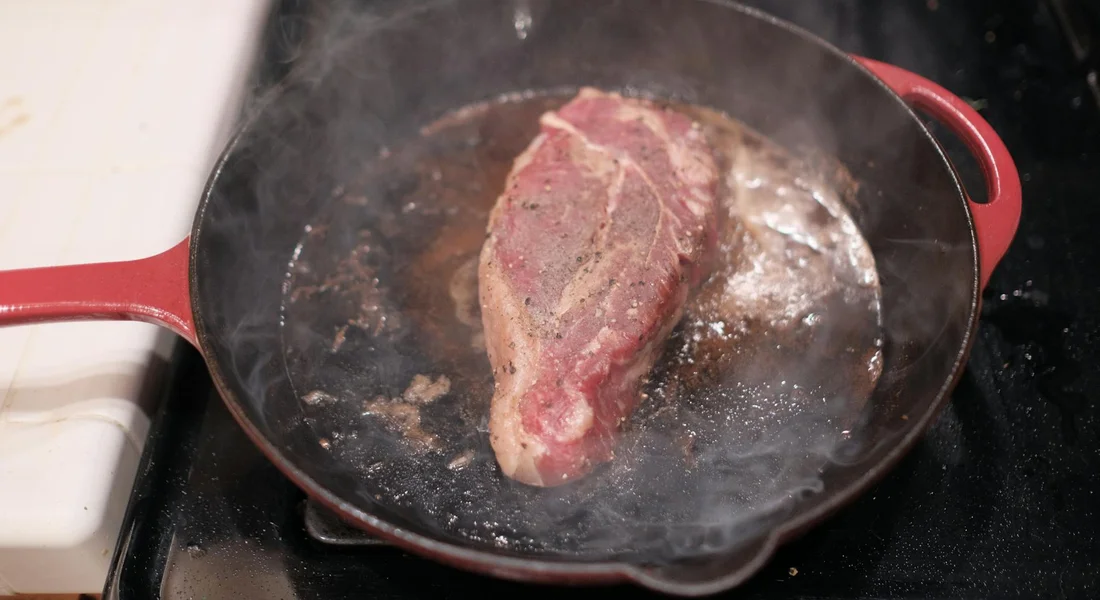
Myth: Induction Doesn’t Get a Cast Iron Pan Hot Enough to Sear
This myth is completely backwards. Induction is incredibly efficient at transferring energy directly into the pan. My 12-inch skillet heats up for searing a steak in about half the time it takes on my gas burner. The coil can pump intense heat directly into the iron, often reaching higher temperatures faster.
For creating a perfect crust, induction’s rapid, targeted heating makes it an excellent partner for cast iron searing.
Myth: The Glass Cooktop Will Definitely Crack or Scratch
You do need to be mindful, but you don’t need to be afraid. Modern induction cooktops are made with strong, tempered glass-ceramic. The main risks are sliding a heavy pan (always lift it) or cooking with a dirty, gritty bottom. A bit of carbon buildup or a small food particle trapped underneath can act like sandpaper.
I make a habit of wiping my cooktop and the bottom of my pan before each use. Scratches are almost always from user error, not from simply using cast iron. Cracking is exceptionally rare and usually related to a severe impact or a pre-existing flaw in the glass.
Treat your glass top with the same care you’d use for a ceramic plate, and you’ll have no problems.
Question: What About a Cast Iron Griddle on Induction?
This is a great question, because a cast iron induction griddle has one specific challenge: size. Induction burners are circular and have a maximum effective heating area. If you place a large, rectangular griddle over a standard burner, only the section directly over the coil will get hot. You’ll end up with cold spots at the edges.
The solution is to use a cooktop with a linked or expanded zone feature, which combines two burners into one long heating element. If you don’t have that, choose a griddle that matches the size of your largest single burner for more even cooking.
For even heat, your griddle’s cooking surface should align closely with the shape and size of your induction burner.
Common Questions
Do I need a special cast iron induction pan or set?
No. Any plain cast iron pan that passes the magnet test is induction-ready. Specialized sets offer no functional advantage for the cooktop itself. Your focus should be on the pan’s condition—a flat, smooth bottom and good seasoning—not marketing labels. It’s also important to ensure that your pre-seasoned cast iron is safe and of high quality for the best cooking experience.
Will using an induction cooktop ruin my enameled cast iron Dutch oven?
No, not if you use it correctly. The iron core is magnetic, so it works. The key is to avoid extreme thermal shock. Always preheat on low-medium and let the cookware cool down naturally on the stovetop before cleaning to prevent damaging the enamel.
When should I consider a cast iron induction cooking adapter?
Only as a temporary fix for a single, irreplaceable non-magnetic pan. It is inefficient and offers poor heat control. Instead, invest in a proper magnetic cast iron piece. Your cooking results and seasoning maintenance will be far superior.
Cast Iron and Induction: A Steward’s Advice
When cooking with cast iron on induction, always begin with a low heat setting and increase it slowly. This method protects your pan from thermal shock and preserves the hard-earned seasoning you’ve built. On induction, maintenance matters. Regular seasoning and careful cleaning keep the pan performing its best. If you’re interested in related care topics, like selecting the best oil for seasoning or safely cleaning a well-used skillet, The Iron Patina has detailed guides ready for you.
Deep Dive: Further Reading
- Can I Use Cast Iron on an Induction Cooktop? – Lodge Cast Iron
- r/AskCulinary on Reddit: Is induction stove top safe for lodge cast iron or not?
- Does cast iron work on induction cooktops? – Field Company
- Can You Use Cast Iron on Induction Cooktops? | Whirlpool
- Hi, does cast iron cookware work on induction cook tops?
- Q: Can you use Lodge cast iron pots for induction cooking
A material science expert by profession, Joseph is also an avid cook. He combines his 10+ years expertise in material science and metallurgy with his passion for cast iron cookware to bring you best hands on advice. His expertise ranges from types of cast iron cookware to best seasoning tips as well as restoration of vintage cast iron utensils. Joe is here to help you solve all your cast iron cookware queries and questions.