
Why Does Food Stick to My Cast Iron (and How Do I Stop It?)
It’s incredibly frustrating when that egg or piece of chicken fuses itself to your favorite skillet. Food usually sticks to cast iron for one of three simple reasons: the pan isn’t hot enough, you’re not using enough fat, or the seasoning needs a little help.
Fixing this is easier than you think. This guide will walk you through the straightforward fixes and habits that build a naturally non-stick surface over time.
- The right way to preheat your pan to create a thermal barrier.
- How to use oil effectively, not just generously.
- Simple maintenance steps after cooking to make your next meal even better.
- Troubleshooting a pan that sticks no matter what you try.
Quick Snapshot: The Non-Stick Foundation
Sticking usually comes from just a few simple mistakes. Think of this table as your troubleshooting cheat sheet. If food is sticking, come back here and check these three points first.
I keep a mental version of this checklist taped to my forehead. It has saved my bacon, literally, more times than I can count.
What Your Pan Needs Before the Food Hits It: The Pre-Heat
This is the step everyone wants to skip. I get it. You’re hungry. But if you remember only one thing from this article, let it be this: a properly preheated pan is non-negotiable.
Cast iron heats slowly and unevenly compared to other metals. If you add food to a cold or even a warm spot, it will weld itself to the microscopic pores of the metal. Preheating gives the entire cooking surface time to reach a consistent, high temperature. This creates a kind of thermal force field that prevents proteins and starches from bonding directly to the iron. This comes from cast iron’s high thermal mass and porous microstructure, which store heat and release it slowly. These properties explain why it retains and distributes heat differently than other metals.
The Water Bead Test: Your Instant Temperature Gauge
You don’t need a fancy infrared thermometer. Your kitchen already has the perfect tool: a few drops of water.
- Start heating your empty pan over medium to medium-low heat.
- Give it a solid 5 to 8 minutes. Be patient.
- Sprinkle a few drops of water onto the surface.
If the water sizzles and evaporates instantly, the pan is still too cold. If the water dances and beads up like tiny mercury balls, skating around the surface before disappearing, your pan is perfectly preheated and ready for oil. This is called the Leidenfrost effect, and it’s your green light.
Oil in a Cold Pan vs. a Hot Pan
This is where the magic happens. Adding oil to a cold pan lets it soak into the metal. When you then heat it up, that oil breaks down and can become gummy, creating a sticky surface.
Adding your cooking fat to a properly preheated pan changes everything. The oil thins out immediately, flowing into every tiny imperfection in the seasoning. You are essentially giving the pan a final, ultra-thin, non-stick coat right before the food arrives. It forms a slick barrier, not a glue.
My routine is simple: preheat the dry pan, pass the water bead test, *then* add and swirl my oil. Let the oil heat for just 30 seconds until it shimmers, and then add your food. This 60 seconds of patience is the best investment you can make for a perfectly released meal.
Is Your Seasoning Really Non-Stick? How to Check and Fix It
Many people think their pan’s dark color is a non-stick coating. It’s not. True seasoning is a layer of oil that has been heated to the point where it bonds to the iron and polymerizes, turning into a hard, slick surface. Think of it like multiple thin, cured layers of paint, not a single thick coat of grease. From a chemistry perspective, the seasoning works by polymerization, where oil bonds to the iron. Polymerization creates a non-stick surface built from multiple thin layers.
A proper seasoning layer isn’t sticky or greasy; it’s a dry, hard finish that food naturally releases from.
How to Check Your Seasoning’s Health
You can tell a lot just by looking and feeling. A healthy pan has a finish that ranges from deep bronze to matte black, and it should feel smooth to the touch.
- Run your fingertips over the cooking surface. Does it feel slick and hard, like a smooth river rock? That’s good.
- Does it feel slightly rough or dry? That’s often fine and typical for well-used iron.
- Does it feel sticky, greasy, or tacky, even when the pan is cool? That’s a sign of trouble.
Here’s a quick test. Heat your dry, clean pan over medium heat for two minutes. Add a single drop of water. If it beads up and skitters across the surface, your seasoning is in great shape. If it just sits and boils away instantly, the surface may be too rough or porous, needing some attention.
A Simple Stovetop Seasoning Refresh
You don’t always need a full oven session. For routine maintenance or fixing a slightly sticky spot, a stovetop refresh works perfectly. I do this on my daily driver skillet every few months.
- Wash and thoroughly dry your pan.
- Place it on a burner over medium-low heat for 3-5 minutes to get it completely warm and dry.
- Add about ½ teaspoon of your preferred oil (I use grapeseed) to the warm pan.
- Use a folded paper towel and tongs to spread the oil over every surface, inside and out.
- Now, take a clean, dry paper towel and buff the pan aggressively. Your goal is to wipe away every visible trace of oil, as if you made a mistake and are trying to remove it all. What remains is a microscopically thin, perfect layer.
- Turn the heat to medium or medium-high. Let the pan heat until it just starts to smoke, then let it smoke lightly for 1 minute.
- Turn off the heat and let the pan cool completely on the burner. You’re done.
This method works because it forces you to use the minimal amount of oil needed to build a hard polymer, not a soft, gummy one.
Sticky and Gummy vs. Hard and Slick
This is the most common seasoning mistake. The difference comes down entirely to how much oil is left on the pan before heating.
| Sticky, Gummy Layer | Hard, Slick Layer |
|---|---|
| Result of too much oil left on the surface. | Result of wiping off all excess oil before heating. |
| The oil partially polymerizes but remains soft and tacky. | The thin layer of oil fully polymerizes into a hard plastic-like finish. |
| It will collect debris, feel sticky, and cause food to bond to it. | It feels dry and smooth, creating a natural release surface. |
| It often looks uneven, splotchy, or excessively glossy. | It usually has a consistent, semi-matte or satin sheen. |
If your pan is sticky, don’t worry. You can fix it. Just give it a good scrub with soap and water to remove the gummy residue, dry it well, and apply a fresh, *thin* layer using the stovetop method above.
The Goldilocks Zone: Finding the Right Cooking Temperature
Heat management is the single most important skill for a non-stick surface. Your pan’s seasoning is like a well-cured paint job. If the paint isn’t dry, things stick to it. If you torch it, it burns off. Your goal is to get the pan hot enough that the oil and the seasoning work together, creating a slick, released surface.
Get this step wrong, and even a perfectly seasoned pan will give you trouble.
The Danger of Too Little Heat
Starting with a cold pan or one on very low heat is a common mistake. When you add fat to a lukewarm surface and immediately add food, the oil doesn’t polymerize. Instead, it gets absorbed by the food.
This means your egg or potato pancake essentially glue themselves directly to the microscopic pores of the cast iron, and you’ll be scrubbing for days.
Low heat fails to create that instant barrier of vaporized moisture that lifts food slightly off the surface, which is what you want for a clean release.
The Danger of Too Much Heat
The other extreme is just as problematic. Crank the burner to high, and you risk damaging the very seasoning you’ve worked to build. High heat can cause the polymerized oil layers to carbonize and break down, making the surface rough and sticky.
It also causes food to scorch and fuse to the pan almost instantly. That blackened crust on your chicken breast isn’t flavor, it’s a permanent carbon bond that’s very hard to remove.
Excessive heat burns seasoning away and cooks carbonized food onto your pan, creating a rough, sticky mess that defeats the purpose of your care.
How to Find the Sweet Spot: Look and Listen
You don’t need a laser thermometer, just your senses. Here is my process for almost every cook.
- Place your dry pan on a medium burner. Give it a solid 3 to 5 minutes to preheat. The entire surface, including the sides, should feel warm when you hold your hand near it.
- Add your cooking fat (oil, butter, lard). Let it heat for 60 to 90 seconds. Watch it closely.
- You’ve hit the target when the oil thins out and begins to shimmer or show faint, lazy ripples. It should not be smoking. If it smokes, your pan is too hot. Take it off the heat for a minute to cool down.
- The final test is auditory. When you gently lay your food into the pan, it should greet you with a confident, immediate sizzle. That sizzle is the sound of success, the sound of moisture flashing to steam and creating lift.
Applying This to Your Trickiest Foods
Let’s connect this directly to the foods people struggle with most.
For Eggs: Patience is everything. Preheat your pan on medium-low for a full 5 minutes. Add a good pat of butter. Wait for it to melt and foam, but not brown. The moment you pour in a beaten egg or crack one in, it should sizzle softly and the edges should set almost immediately. If it doesn’t sizzle, your pan wasn’t hot enough.
For Fish: Fish skin releases best from a hot, oily surface. Use a medium-high preheat and an oil with a higher smoke point, like avocado or refined coconut oil. Get the oil shimmering. Pat your fish fillet very dry, place it skin-side down, and press gently for the first 10 seconds. You should hear that active sizzle. The fish will tell you when it’s ready to flip, it will release easily.
For Pancakes: An even, medium heat is your friend. Let your pan or griddle preheat thoroughly. A drop of water should dance and evaporate quickly. Lightly grease the surface, then pour your batter. You should see bubbles forming in the center of the pancake within a minute or so. If the pancake is browning too fast or too slow, adjust your burner down or up in small increments for the next one.
Oil: Your Slippery Ally, Not a Pool
Think of fat in your pan like the coating on a non-stick pan. It creates a slick, protective barrier between your food and the metal. But it does more than that. Oil is a fantastic conductor of heat. A thin, even layer helps spread the heat from the pan’s surface evenly across your food, which promotes a beautiful sear and helps food release naturally when it’s ready.
It’s this combination of providing a release surface and improving heat transfer that stops food from grabbing onto the microscopic pores of your cast iron.
Choosing Your Oil Wisely
Not all oils are created equal for cooking. The most important factor is its smoke point. This is the temperature at which the oil starts to break down, smoke, and create a sticky, gummy residue that will absolutely cause sticking.
- Use a high-smoke point oil for high-heat searing and frying. These are your workhorses.
- Save low-smoke point oils, like extra virgin olive oil or butter, for finishing dishes or low-heat cooking.
My everyday go-to is refined avocado oil for its very high smoke point. For seasoning in the oven, I use food-grade flaxseed oil. Here’s a quick guide.
| Oil Type | Best For | Smoke Point |
| Refined Avocado Oil | Searing, frying, general cooking | Very High (520°F) |
| Grapeseed Oil | Searing, sautéing | High (420°F) |
| Regular Olive Oil | Medium-heat cooking | Medium-High (410°F) |
| Extra Virgin Olive Oil | Low-heat cooking, finishing | Low-Medium (325-375°F) |
| Butter | Low-heat cooking, finishing | Low (302°F) |
The “Wipe It On, Then Wipe It Out” Technique
This is the single most important skill for a non-stick surface. You want the oil to fill the microscopic pores of the iron, not sit on top of them. Regular seasoning with a thin coat of oil is how you maintain your cast iron cookware for years to come.
- Warm your clean, dry pan over low heat for a minute. This opens the pores slightly.
- Add a small amount of oil-about a teaspoon for a 10-inch skillet.
- Use a folded paper towel or lint-free cloth to spread the oil over the entire cooking surface, sides, and handle.
- Now, take a second, clean paper towel and thoroughly wipe the pan as if you made a mistake and are trying to remove all the oil. This leaves the perfect, nearly invisible film.
If you can see shiny pools or streaks, you have used too much. That excess oil will polymerize into sticky spots.
How Much Oil is “Too Much”?
If your pan looks wet or glossy after you’ve wiped it, it’s too much. The correct amount looks dry to the eye but feels slick to a light touch. Imagine you are applying the oil to protect the metal, not to fry in it yet.
I check my own 12-inch skillet by wiping it with a clean, white paper towel after the final wipe-down. If the towel comes away with a clear, faint stain, the layer is perfect. If it comes away with a dark, wet mark, I need to wipe more oil out. That excess oil is what turns sticky, attracts carbonized food bits, and defeats the entire purpose. A thin, even film polymerizes into a hard, slick layer. A thick pool bakes into a tacky, uneven mess.
Cleaning That Protects Your Non-Stick Surface
Think of your pan’s seasoning like a well-built-up finish on a wooden table. You clean the table to keep it nice, not to strip it bare. Your goal with cleaning is to remove food residue, not the seasoned surface you’ve worked so hard to build. In the full post-use guide, we’ll walk through how to clean a cast iron pan after cooking to preserve that seasoning. You’ll learn quick, effective steps that refresh the surface without stripping it.
Soap Is Your Friend, Not Your Enemy
Let’s put the old “no soap” rule to rest for good. That advice comes from a time when soaps contained lye, which is a powerful stripping agent. Modern dish soaps are mild detergents designed to cut grease from dishes, not polymerized oil from your pan.
Using a drop of gentle dish soap with a soft sponge will not ruin your seasoning; it will simply clean off the food oils and particles that hot water alone can’t tackle. I keep a bottle of plain, non-antibacterial soap by my sink just for my cast iron.
The Five-Minute Post-Cooking Cleanup
This routine is what keeps my daily driver skillet in top shape. Do this while the pan is still warm, but not scalding hot.
- Fill the warm pan with a little hot tap water and let it sit for a minute on the cooling stove. This loosens any bits.
- Pour out the water, add a single drop of dish soap, and scrub with a non-abrasive sponge or brush. You should not see brown or black sludge coming off; that’s your seasoning. You’re just wiping away food.
- Rinse thoroughly with hot water.
- This is the critical step: dry it immediately and completely. I dry mine with a towel, then put it back on a warm burner for a minute to evaporate every last drop of water.
- Once it’s bone-dry and slightly warm from the burner, I apply the tiniest amount of oil with a paper towel, then buff it all off as if I made a mistake and didn’t mean to put any on at all.
Dealing with Stuck-On Food Gently
Sometimes, a sear goes a bit too well and food bonds to the surface. Don’t reach for steel wool or harsh scouring pads. You have kinder, more effective tools.
For a pan with stuck-on bits, pour in about a cup of water and bring it to a simmer on the stove. Use your spatula to gently scrape the bottom as it bubbles. The steam and heat work to release the food without you having to scrub aggressively.
My favorite tool for this job is a chainmail scrubber; it’s abrasive enough to scrub off stubborn carbonized food, but its rounded links glide over the hard, smooth seasoning without scratching it. A little kosher salt with a drop of oil also makes a great gentle abrasive paste for spot-cleaning.
The Final Step: Dry and Protect for Storage
Rust is the enemy of your non-stick surface, and moisture is rust’s best friend. Letting a pan air-dry is asking for trouble, as even a microscopic film of water can start the oxidation process.
That quick, post-clean oil application isn’t about building new layers. It’s about putting a protective barrier between your beautifully seasoned iron and the humidity in your kitchen air. A pan stored with a microscopically thin coat of oil is a pan that stays smooth, dark, and ready for your next meal. I do this with every single piece, every single time, and it makes all the difference.
Troubleshooting Specific Sticky Foods
Some foods just have a reputation for sticking. The good news is, with a well-maintained pan and the right technique, that reputation is often undeserved. Let’s break it down by category.
Eggs: The Ultimate Test of Technique
Everyone wants that perfect slidey egg. When it doesn’t happen, it’s easy to blame the pan. Usually, the issue is in the method.
First, your fat matters. Butter burns at high heat. For fried eggs, I use a mix: a little high-smoke-point oil (like avocado or grapeseed) to coat the pan, then a pat of butter for flavor. The oil protects the seasoning and butter from scorching.
The most common mistake is cooking eggs in a pan that’s either too cold or too hot. You need a solid medium-low to medium preheat. Wait until a drop of water dances on the surface before adding your fat, then the eggs.
Finally, be patient. Let the egg white set completely around the edges before you even think about a spatula. A properly cooked egg will release from the seasoning on its own when it’s ready. If you have to pry it up, it wasn’t done.
Proteins: Fish, Meat, Bacon, and Paneer
All these foods follow the “sear and release” principle. A good sear creates a crust that naturally detaches from the pan’s surface.
The key is letting the pan and the science do the work. Place your dry, room-temperature protein into your preheated, oiled pan. You should hear a confident sizzle. Now, leave it alone. For a steak or a piece of fish, don’t touch it for a full 3-4 minutes. It will tell you when it’s ready to flip by releasing easily.
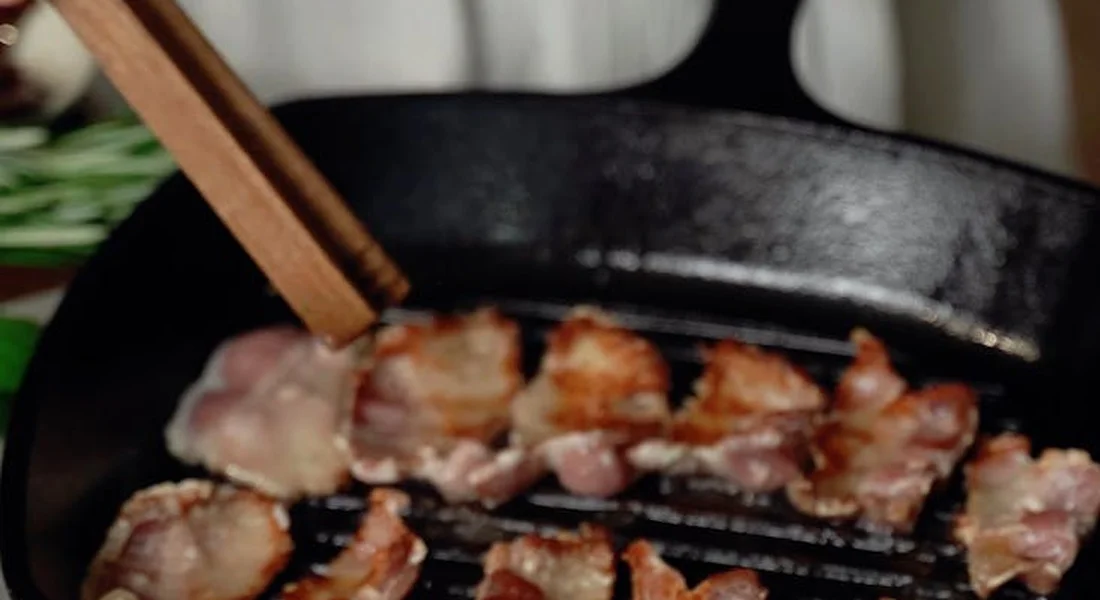
Bacon only sticks to a cold pan. I start my bacon in a cold skillet on low heat, letting the fat render slowly. This gently seasons the pan as it cooks and prevents any sticking from the start. My favorite weekend breakfast involves cooking bacon first, then using that rendered fat to cook everything else.
For paneer or other proteins that might be wet, pat them thoroughly dry with a paper towel. Moisture is the enemy of a good sear and will cause sticking every time.
Starchy Items: Potatoes, Pancakes, and Hash Browns
These are sticky because they contain sugars and starches that bond eagerly to metal. You defeat them with heat and restraint.
Adequate preheat is non-negotiable. Give your skillet a good 5 minutes over medium heat. Then, add enough oil to generously coat the cooking surface. For home fries, I’ll often use a mix of oil and a little butter for flavor and browning.
Once the food hits the pan, resist the urge to move or flip it for several minutes. You are trying to build a golden-brown crust that acts as a barrier between the starchy food and your seasoning. If you try to turn a pancake too early, it will tear. If you stir potatoes too soon, they’ll stick and become mush. Wait for the edges to look cooked and the bottom to release naturally when you slide a spatula under it.
Cheese and Sauces: A Different Kind of Sticky
Let’s be honest: a cheesy casserole or a tomato-based sauce will likely leave some residue. That’s okay. In many cases, this light sticking is what creates the “fond”-the flavorful browned bits at the bottom of a pan used for making a sauce.
The goal here isn’t always a perfectly clean release. It’s managing the aftermath to protect your pan. For cleanup, never let acidic or cheesy residue sit in your pan. Once you’re done cooking, let the pan cool slightly, then add some warm water and use a wooden spatula or a chainmail scrubber to gently loosen the stuck-on bits. A little baking soda can help neutralize acids. Clean it promptly, dry it thoroughly, and give it a quick, thin coat of oil if needed. This approach turns a potential seasoning challenge into routine maintenance.
My Toolkit for a Sticking-Free Kitchen
Your cooking tools are an extension of your hands. The right ones make seasoning maintenance easy. The wrong ones can undo hours of your hard work in seconds. This is not about having every gadget. It is about having a few reliable, multi-purpose tools that support your pan’s natural non-stick layer.
The Essential Four
These are the tools I keep within arm’s reach of my stove. They handle 95% of my cast iron cooking and cleaning.
- A Sturdy, Flat-Edged Metal Spatula: This is your most important tool for preventing sticking while you cook. Look for one with a straight front edge and slightly rounded corners. A thin, flexible blade is better than a thick, rigid one.
- A Chainmail Scrubber: This is for cleaning, not cooking. It looks intimidating, but it is one of the most seasoning-friendly cleaners you can buy. It scours off stuck-on food without harming the polymerized oil layer underneath.
- Lint-Free Cloths (like blue shop towels): Paper towels can leave fibers behind, especially on a newer, slightly sticky seasoning layer. Lint-free cloths give you a clean surface for applying thin coats of oil.
- Appropriate Oils: You need two types: a high-smoke point oil for cooking (like avocado, grapeseed, or refined coconut) and a neutral oil for maintenance coating (like Crisco or canola). The cooking oil performs under heat. The maintenance oil is for building seasoning after cleaning.
Why a Metal Spatula is Your Best Friend
Many people are scared to use metal on cast iron. I was too, until I tried it. A good metal spatula does not hurt your seasoning. It actually helps it. I’ve debunked that myth—that metal will scratch or strip your seasoning. With the right utensil and proper care, metal tools can be safe for cast iron and even benefit the seasoning.
Think of your seasoning like a well-trodden forest path. A flat metal spatula smooths and compacts the path as you go, gently leveling microscopic peaks and valleys in the polymerized oil. A soft spatula just rides over the top. When you slide that thin metal edge under food, you are cleanly releasing it from the surface. You are not scraping. You are gliding. This action prevents you from having to tug or pry, which is what truly causes food to tear and stick.
The flat edge allows you to make full contact with the cooking surface, effectively “scooping” up the fond (those tasty browned bits) without digging into your pan’s finish. I keep one specific spatula just for my cast iron. Its edge is worn smooth from use, and it slides under eggs without a second thought.
Tools and Habits to Avoid
Some common kitchen helpers are not so helpful for cast iron longevity. The goal is to preserve your seasoning, not strip it away with every wash.
- Harsh Abrasive Cleaners or Powders: Avoid scouring powders like Comet or Barkeeper’s Friend for routine cleaning. They are fantastic for total restoration when you need to strip rust or old gunk, but they are too aggressive for daily care and will thin your seasoning over time.
- Metal Scouring Pads for Routine Cleaning: Those coiled steel wool pads are for heavy-duty rust removal, not for washing out yesterday’s skillet cornbread. They will leave fine scratches and create a surface that food grabs onto more easily.
- Cooking with Extreme High Heat Empty: This is a habit, not a tool, but it belongs here. Blasting high heat into a dry pan, especially a newer one, can cause micro-fractures in the seasoning. It makes the surface rough. Always start with some fat in the pan, even if it is just a light coating.
Your toolkit is simple. A metal spatula to manage the cooking surface, a chainmail scrubber to clean it gently, the right cloths and oils to maintain it. With these, you are not just preventing food from sticking to cast iron cookware. You are actively building a more resilient cooking surface every time you use your pan.
When Sticking Means Something is Wrong: Diagnosis
If food is constantly welding itself to your pan, it’s time to do a little detective work. Persistent sticking usually points to one of two culprits: your cooking technique, or the pan’s seasoning itself.
Think of it like trying to write on a wet piece of paper. Your pen (the food) will tear the surface no matter how carefully you move it. A good, dry surface is everything.
Is It Your Technique or Your Pan?
First, rule out the common technique mistakes. Ask yourself these questions.
- Did I preheat the pan long enough? A properly preheated pan creates a temporary non-stick surface as the metal expands. A cold pan is a sticky pan.
- Is my heat too high? Cast iron holds heat incredibly well. Medium heat is often plenty. Ripping hot oil burns onto the pan and bonds with your food.
- Was my oil layer thin enough? You want a whisper of oil, not a puddle. A thick layer will polymerize into a sticky, gummy residue that food adheres to.
- Did I move the food too soon? Proteins like eggs, fish, or steak need time to release naturally. If you try to flip or move them before a crust forms, they’ll tear and stick every time.
If you can confidently say your technique is sound, the issue is almost certainly with your pan’s seasoning.
Signs of Failing Seasoning: Refresh vs. Restore
Not all seasoning problems are created equal. Some need a simple touch-up. Others require starting from scratch. Here’s how to tell the difference.
Your seasoning likely just needs a refresh if you see:
- Dull, dry, or chalky patches on the cooking surface.
- Minor, superficial rust spots that wipe away easily with oil.
- Slight, consistent sticking, but the pan still feels mostly smooth.
A refresh means applying one or two new layers of seasoning in the oven. It’s routine maintenance, like applying a fresh coat of wax to a car.
Your seasoning needs a full restoration if you see:
- Flaking or peeling, where the polymerized oil is literally coming off in chips or sheets.
- Rust that is pitted, textured, or doesn’t wipe clean with oil.
- A sticky, tacky feel even after the pan is completely cool and dry.
- Large, bare patches of gray or silver metal visible on the cooking surface.
Restoration is a reset button; it involves stripping the old, failed seasoning down to bare iron and building it back up from scratch. I had to do this with a vintage skillet I found that was completely covered in rust. The process takes time, but it brings the pan back to life. That same clean and restore vintage cast iron skillets approach works for vintage pans. Start with a careful strip, then finish with a fresh seasoning.
The Final Reassuring Checklist
Before you decide to re-season, run through this final list. It cuts to the heart of good cast iron cooking.
- Preheat low and slow? Check. Give your pan at least 5 minutes on low-to-medium heat.
- Used a thin, even layer of oil? Check. Wipe it on, then try to wipe it all off with a clean towel. What’s left is the perfect amount.
- Cooked with patience? Check. Let the food tell you when it’s ready to release.
If you’ve checked all these boxes and your eggs still fuse to the surface, your seasoning needs attention. Don’t see it as a failure. It’s just your pan asking for a little care. Every layer you add makes it better.
Common Questions
Why are eggs and fish such a sticking challenge for cast iron?
Eggs and fish are delicate proteins with high surface moisture. If your pan isn’t properly preheated, that moisture instantly soaks into the pores of the iron, creating a glue. The key is a confident, immediate sizzle upon contact, which vaporizes that moisture and creates lift. For fish, always pat the skin bone-dry first.
My pan is well-seasoned, so why does cheese still stick?
Cheese sticking isn’t a seasoning failure; it’s chemistry. Melting cheese contains proteins and fats that bond directly to hot metal as they cook and solidify. For dishes like grilled cheese or a frittata, use a sufficient fat barrier and accept that some fond is normal. Clean the pan promptly after with warm water and a gentle scrub.
How do I know if my maintenance routine is actually helping the seasoning?
Your routine should make the pan smoother and darker over time, not sticky or splotchy. After cleaning and applying your micro-thin coat of oil, the surface should look and feel dry, not glossy. If it’s sticky, you’re using too much oil. If it’s rough or rusting, you’re not drying it thoroughly or protecting it before storage.
Keeping Your Cast Iron Cooking Surface at Its Best
The single most effective way to prevent food from sticking is to master your heat and let your pan preheat properly. Combine that with a well-maintained layer of seasoning, and you create a naturally non-stick surface that improves with every use. For more on building that perfect foundation, our guides on seasoning and cleaning offer detailed, step-by-step help.
Expert Resources and Citations
- How to Keep Food From Sticking to Cast Iron – Lodge Cast Iron
- equipment – What causes sticking and what can I do to reduce food sticking to my cast-iron skillet? – Seasoned Advice
- r/castiron on Reddit: WHY does EVERYTHING keep sticking to my cast iron pan?
- What can I do if food is always sticking to my cast-iron pan after I cook? – Quora
A material science expert by profession, Joseph is also an avid cook. He combines his 10+ years expertise in material science and metallurgy with his passion for cast iron cookware to bring you best hands on advice. His expertise ranges from types of cast iron cookware to best seasoning tips as well as restoration of vintage cast iron utensils. Joe is here to help you solve all your cast iron cookware queries and questions.