
How Do You Cook with a Cast Iron Pan for Perfect Results?
When I first used my cast iron skillet, I worried about ruining the seasoning or ending up with stuck-on food. With a few simple techniques, you can cook confidently and actually improve your pan’s non-stick surface over time.
Based on my experience with my own well-loved pans, here are the key methods we’ll cover to ensure success every time you cook.
- Master the art of preheating your pan for even heat and no hot spots.
- Use the right amount of oil to prevent sticking and strengthen your seasoning.
- Clean your pan effectively without damaging its hard-earned patina.
- Control your stove’s temperature to avoid burning and cook food perfectly.
Key Takeaways for Immediate Success
Before we get into the details, here are the core promises of cooking with cast iron. Master these, and you’ll master the pan.
- Always Preheat Gently: Rushing this step is the top cause of food sticking. A patient start leads to a perfect release.
- Fat is Your Friend: A thin layer of oil or butter is the final, critical barrier between your food and the pan’s surface.
- Don’t Fear High Heat: Once properly preheated, cast iron excels at searing. It’s built for it.
- Maintenance is Part of the Process: Cleaning and drying your pan right after cooking is how you build its legendary patina over time.
Your First Move: The Right Start in a Preheated Pan
If I had to give you one piece of advice to prevent sticking, it would be this: never cook in a cold cast iron pan. Preheating is non-negotiable. Think of your pan’s seasoning like a non-stick coating that needs to warm up and slightly expand to become effective. Starting with cold food on a cold surface is a recipe for a messy cleanup.
The “Low and Slow” Method
Forget cranking the burner to high right away. That creates hot spots and can shock the seasoning. Here is my foolproof method:
- Place your dry pan on a cold burner.
- Set the heat to low. Let it sit there for a full 5 minutes. This allows the entire pan, including the handle, to begin warming evenly.
- After 5 minutes, increase the heat to your target cooking temperature, usually medium or medium-high. Give it another 3-5 minutes to fully come up to heat.
This gradual approach ensures the heat distributes evenly across the entire cooking surface, which is the secret to consistent results.
The Water Droplet Test
How do you know when the pan is ready? Use the water test. Flick a few drops of water onto the surface.
- If the water sizzles and evaporates instantly, the pan is not hot enough. Wait longer.
- If the water beads up and dances around the pan like tiny mercury balls, it’s perfectly preheated. This is called the Leidenfrost effect, and it means your pan is ready for oil and food.
I use this test on my daily driver skillet every single time I cook.
Answering Your FAQ: What is the proper way to preheat a cast iron pan?
The proper way is the patient way. Start low, go slow, and use the water bead test to confirm. Proper preheating has nothing to do with maximum heat and everything to do with even, controlled heat. A pan that’s evenly hot will cook your food beautifully and release it cleanly when it’s ready. This is the foundational technique everything else builds upon.
Mastering Cast Iron Heat: From Searing to Simmering
Think of your cast iron pan like a thermal battery. Unlike thin, reactive pans that heat up and cool down in seconds, cast iron absorbs heat slowly and releases it just as slowly.
This incredible heat retention is your greatest tool for a perfect sear, but it also means you must manage your burner differently.
You almost always need less heat than you think. Start on medium heat and give the pan a solid five to ten minutes to preheat evenly. If you crank the burner to high, you’ll create a small, super-hot spot directly over the flame while the rest of the pan lags behind. I preheat my daily driver skillet on a medium-low flame for most tasks.
Techniques for High-Heat Tasks
For a stellar sear on a T-bone steak or a golden crust on mahi mahi, your pan needs to be properly hot. After the gentle preheat, bump the heat to medium-high for a minute or two. The pan is ready when a few drops of water flicked onto the surface dance and evaporate instantly.
The goal is to create a flavorful, textured crust quickly, which naturally helps the food release from the pan’s surface. For fish like mahi mahai, pat the filet completely dry first. A wet surface steams instead of sears. Gently lay it in the hot, oiled pan and do not touch it. The cooking time is less about a stopwatch and more about watching for the edges to become opaque and the crust to form, which signals it’s ready to flip.
How Do You Prevent Food from Sticking? The Fat & Patience Method
A well-seasoned pan provides a smooth foundation, but true non-stick performance comes from your technique. It’s a partnership between your seasoning and your actions.
The golden rule for meats, fish, and vegetables is “hot pan, cold fat.” Let your preheated, dry pan come to temperature, then add your room-temperature cooking oil or butter. It should shimmer immediately. This quick action creates a microscopic barrier between the food and the iron.
Your greatest enemy here is impatience. When you lay food in the pan, you must let it cook undisturbed until it releases on its own. If you try to pry up a steak or salmon filet before it’s ready, you’ll tear the beautiful crust you’re trying to build and leave half of it stuck to the pan. It will tell you when it’s ready to move.
The Ultimate Test: How to Cook Eggs in a Cast Iron Pan
If you can cook an egg without sticking, you’ve mastered the basics. This is where most people go wrong, usually by using too much heat.
- Preheat your clean, seasoned pan on the lowest heat setting for a full 5 minutes.
- Add a generous pat of butter or a tablespoon of oil and swirl to coat.
- Gently crack your egg into the pan. You should hear a gentle sizzle, not a violent spatter.
- Let it cook slowly. You can even cover the pan briefly to set the top of the egg white without flipping.
The combination of a gently preheated pan, ample fat, and low heat allows the egg to set without bonding aggressively to the seasoning. My own egg pan never sees heat above a “3” on my stove dial. It’s a lesson in low and slow that applies to almost everything you cook.
What Should You Cook (and Avoid) in Your Skillet?
Think of your cast iron as a kitchen workhorse. It’s not a delicate specialist tool. Its incredible heat retention and even heating make it perfect for jobs where you need steady, high heat. Understanding the thermodynamics behind cast iron helps appreciate why it excels at heat retention and distribution.
My own daily drivers are perfect for four main jobs.
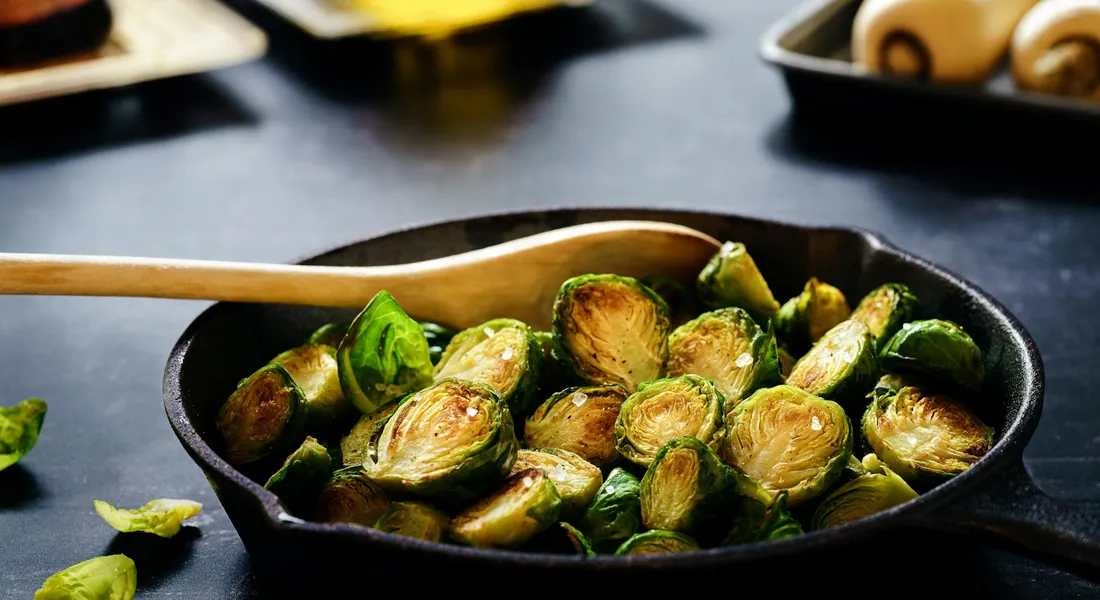
- Searing: Nothing creates a better crust on a steak or chop. The pan holds its temperature even when you add cold food.
- Baking: From cornbread to deep-dish pizza, cast iron gives you crispy, golden edges that other pans can’t match.
- Frying: Its stable temperature means consistent results for frying chicken, potatoes, or doughnuts without hot and cold spots.
- Stovetop to Oven: This is a superpower. You can sear a pork chop on the stove, then slide the whole pan into the oven to finish cooking it through.
What types of cooking are cast iron pans best for?
Cast iron pans are best for any cooking that benefits from consistent, high heat and a naturally non-stick surface. That includes searing meats, frying foods, baking breads, and making one-pan meals that start on the stove and finish in the oven. There’s a long list of recipes and techniques to choose from.
But what about tomatoes and other acidic foods?
You can cook acidic foods like tomato sauce or wine-braised dishes in a well-seasoned pan. The seasoning is a polymerized layer, like a hard plastic coat, not a delicate oil slick. With proper care, you can cook acidic foods in cast iron without damaging the seasoning.
Cooking a quick pasta sauce for 20 minutes is generally fine, but letting a highly acidic dish simmer for hours can wear that layer down over time. You might notice a slight metallic taste or see a dull spot on your pan’s cooking surface. If that happens, don’t worry. Just give the pan a quick clean, dry it well, and apply a thin fresh layer of oil. It’s a simple fix, not a disaster.
What should I avoid cooking in a cast iron pan?
The real things to avoid are less about specific foods and more about specific situations.
- Prolonged Acidic Baths: As mentioned, avoid cooking very acidic dishes for several hours at a time, as this can degrade your seasoning over many uses.
- Letting Salty Water Sit: Never leave a pan soaking in water, especially salted water for pasta. This is a fast track to rust. Clean it right after cooking.
Aside from that, your skillet is ready for almost anything. Just cook, clean, and keep it dry.
Cleaning and Care: The 10-Minute Ritual for a Lifelong Pan
Cleaning isn’t a separate chore. It’s the final, non-negotiable step of cooking with cast iron. A good, simple clean protects your hard-earned seasoning and stops rust before it starts.
Here is the simple method I use after every single meal.
- While the pan is still warm (not scorching hot), rinse it with hot water.
- Use a stiff brush or a chainmail scrubber for any stuck-on bits. The chainmail is fantastic because it scrubs aggressively without harming the seasoning.
- If you need it, use a small drop of modern dish soap. Rinse thoroughly.
- Dry the pan completely with a towel.
Can I use soap to clean my cast iron pan?
Yes, you absolutely can use modern dish soap. The old rule came from a time when soap contained lye, which would strip seasoning. Today’s gentle soaps will not harm the polymerized oil layer on a well-seasoned pan. Soap is a tool for cleaning off food residues and oils, not for removing your hard-earned seasoning.
After towel drying, there’s one more critical step. Place the pan on a stovetop burner over low heat for a minute or two. This drives off any invisible water left in the pores of the iron. Once the pan is warm and bone-dry, take it off the heat and let it cool for a minute.
Then, with a paper towel, apply the tiniest amount of oil (canola, grapeseed, or your preferred seasoning oil) to the entire cooking surface. Wipe it around, then use a clean towel to buff off as much as you can. It should look dry, not glossy. This protective micro-layer is what keeps rust away while your pan is in the cupboard.
How do I store a cast iron pan to prevent rust?
Store it in a dry place. That’s the main rule. I keep mine in a kitchen cabinet. If you need to stack pans, place a paper towel or a clean cloth between them. This prevents scratches and allows for air circulation. Your pan is now ready for its next lifetime of cooking.
Common Mistakes and How to Avoid Them
Even the most durable tool needs to be used correctly. These are the slip-ups I see most often, and each one has a straightforward fix.
Shocking a Cold Pan with High Heat
Turning the burner to high while your pan is still cold is a classic error. Cast iron heats slowly, and the intense, uneven heat can cause the metal to expand too quickly. This can lead to warping over time or even cause the pan to crack, especially if it has an existing thin spot or flaw.
Let your pan warm up over low to medium-low heat for at least five minutes before you increase the temperature for cooking. This gentle preheating allows the entire pan, including the handle, to come up to temperature evenly, which is the secret to consistent cooking and a long pan life.
Using Too Little Fat
Thinking of your seasoning as a magical non-stick force field is a mistake. Seasoning is a cured layer of oil, not Teflon. It needs help, especially when you’re starting out or cooking sticky foods like eggs or cheese.
Don’t be shy with your cooking fat, whether it’s oil, butter, or bacon grease, especially during the first few months of using a pan. A thin, even layer provides a slick surface for food to glide on and continuously reinforces your seasoning as it polymerizes with heat.
Moving Food Too Soon
Impatience leads to sticking. When you place food in a hot pan, it needs time to form a crust. If you try to flip or move it immediately, it will tear and stick to the surface.
Wait for the food to release from the pan naturally; you’ll know it’s ready when it moves freely with a gentle nudge from your spatula. This is crucial for getting a perfect sear on steaks, crispy skin on fish, or golden-brown pancakes.
Soaking the Pan
Leaving your cast iron to soak in the sink is an invitation for rust. Prolonged exposure to water, especially soapy water, will break down the seasoning and expose the raw iron to oxidation.
Clean your pan promptly after it has cooled slightly, using hot water and a brush or scrubber. For stubborn bits, use a little coarse salt as a gentle abrasive or simmer some water in the pan to loosen them. Then dry it immediately.
Putting It Away Damp
This is the most direct path to rust. Even a small amount of moisture left in the pan or trapped under a lid will cause orange spots to appear, which are rust on the cast iron.
After washing, always dry your pan thoroughly with a towel and then place it on a warm stovetop burner for a minute to evaporate any residual water. I do this every single time, even with my most well-seasoned daily driver. Once it’s completely dry and cool, you can store it.
The Foundation: Seasoning and Restoration Basics
Everything good about cooking with cast iron starts here. Think of seasoning not as a paint you apply, but as a living finish you build and maintain. Seasoning matters because it protects the pan from rust and builds a natural nonstick surface. That long-term care is what keeps cast iron reliable, meal after meal.
What Is Seasoning?
Seasoning is a layer of fat that has been baked onto the iron at a high temperature until it transforms, or polymerizes. This process turns the liquid oil into a hard, slick, and durable surface that bonds to the metal. It’s not a coating that sits on top; it becomes part of the pan itself, protecting it from rust and creating a natural non-stick surface that improves with use by undergoing polymerization.
How Do I Season a Cast Iron Pan? (The Oven Method)
This is the standard method for building a strong, even base layer. You only need your pan, a high-smoke-point oil (like grapeseed, canola, or flaxseed), and an oven.
- Wash the pan with warm, soapy water to remove any factory dust or oils, then dry it completely.
- Place the pan in a cold oven, then heat it to 200°F (95°C). Let it warm for 15 minutes. This opens the pores of the metal.
- Remove the pan (use oven mitts!). Apply a very thin layer of oil to every surface, inside and out, including the handle.
- With a clean, dry towel, thoroughly wipe off all the oil. It should look almost dry. This step is critical-any excess oil will leave a sticky, blotchy finish.
- Place the pan upside down in the oven (to prevent pooling) on the middle rack, with a sheet of foil on the bottom rack to catch any drips.
- Bake at 450°F (230°C) for one hour. Turn the oven off and let the pan cool completely inside.
For a new or stripped pan, repeat this process 2-3 times. For maintenance, one cycle every few months or after a particularly aggressive cleaning is plenty.
Maintenance vs. Full Restoration
There’s a big difference between maintaining your daily user and bringing a thrift store find back to life. Maintenance seasoning is about upkeep-a quick oven cycle to reinforce the existing layers after normal wear. Full restoration is for pans that are rusty, flaking, or caked with decades of crud. That process involves completely stripping the pan back to bare iron before re-seasoning from scratch.
How Do I Restore a Rusty or Old Cast Iron Pan?
First, assess the damage. Light surface rust is easy. Flaking seasoning or thick, sticky gunk requires more work. Here’s the basic outline I follow in my workshop:
- Strip: For heavy buildup, place the pan in a plastic bag, spray it thoroughly with a yellow-cap oven cleaner (containing lye), seal the bag, and let it sit for 24-48 hours outdoors or in a well-ventilated area. The lye will dissolve the old seasoning. Wear gloves and eye protection.
- De-Rust: For rust, use a 50/50 solution of white vinegar and water. Soak the pan for no more than 30 minutes at a time to avoid etching the metal. Scrub with steel wool or a scrub brush.
- Neutralize & Dry: After either step, wash the pan well with soap and water. Immediately dry it completely on the stovetop.
- Re-season: Once the pan is bare, gray, and dry, you start from the beginning. Follow the full oven seasoning method above 2-3 times to build a new foundation.
It takes time, but pulling a black, glossy finish out of a rusty piece of iron is incredibly satisfying.
Quick Answers
Can I use soap to clean my cast iron pan?
Yes, modern dish soap is perfectly safe for a well-seasoned pan. The old rule stemmed from harsh, lye-based soaps that are no longer common. Use a small amount to cut grease, rinse well, and always dry thoroughly immediately after.
How do I season a cast iron pan?
Seasoning is the process of baking a thin layer of oil onto the iron to create a polymerized, non-stick surface. Apply a microscopically thin coat of a high-smoke-point oil to a clean, dry pan, then bake it upside-down in a hot oven for an hour. Repeat this process 2-3 times for a new pan to build a strong foundation.
How do I restore a rusty or old cast iron pan?
First, assess the damage and clean the rust. Light rust can be scrubbed away with vinegar and steel wool. For severe rust or flaking seasoning, a lye-based oven cleaner may be needed to strip it to bare iron. Once completely clean and dry, you must re-season the pan from scratch using the standard oven method.
Your Cast Iron’s Journey Is Just Beginning
The most important skill for cooking with cast iron is learning to control your heat, starting low and letting the pan come up to temperature slowly. Mastering this one technique will prevent most sticking and protect your pan’s seasoning for years to come. A simple clean-and-season routine will keep your skillet performing at its best. Regular light oiling and gentle reheating after use help maintain the seasoning for years to come. For the full picture on care, our guides on cleaning and storing your skillet are the perfect next step.
Citations and Authoritative Sources
- Cast Iron – Smithey Ironware
- FINEX Cast Iron Cookware Co.
- The Absolute Dummy’s Guide to Cast Iron Skillets | The Kitchn
- Cast Iron Skillets | Lancaster Cast Iron
- r/castiron on Reddit: How to cook with cast iron
A material science expert by profession, Joseph is also an avid cook. He combines his 10+ years expertise in material science and metallurgy with his passion for cast iron cookware to bring you best hands on advice. His expertise ranges from types of cast iron cookware to best seasoning tips as well as restoration of vintage cast iron utensils. Joe is here to help you solve all your cast iron cookware queries and questions.