
Can You Cook the Perfect Steak Without Ruining Your Cast Iron?
I get it, you love your skillet’s glossy black seasoning, and the thought of cranking up the heat for a steak makes you nervous. Let’s clear this up first: cooking a fantastic steak actually makes your pan’s seasoning better, not worse.
This guide is about technique and pan care. You won’t find a list of ingredients here, but you will learn the exact methods I use to get a perfect crust and a clean, happy skillet every time. We’ll cover:
- The right way to preheat your pan to avoid thermal shock
- How to build a steakhouse-quality sear that strengthens your seasoning
- Finishing in the oven for perfect internal doneness
- A simple, no-fuss cleanup that leaves your pan ready for the next cook
Key Takeaways: Your Skillet Steak Success Checklist
Before you even think about the steak, your pan needs attention. This isn’t just about cooking. It’s about working with your cast iron’s unique properties to get a great result and keep your pan in top shape.
- Preheating is non-negotiable for preventing stick.
- High-heat searing is safe for a well-seasoned pan.
- Your skillet needs to rest and cool after cooking.
- Proper post-steak cleaning preserves your seasoning.
- A quick maintenance wipe keeps it ready for next time.
Preheating is Non-Negotiable for Preventing Stick
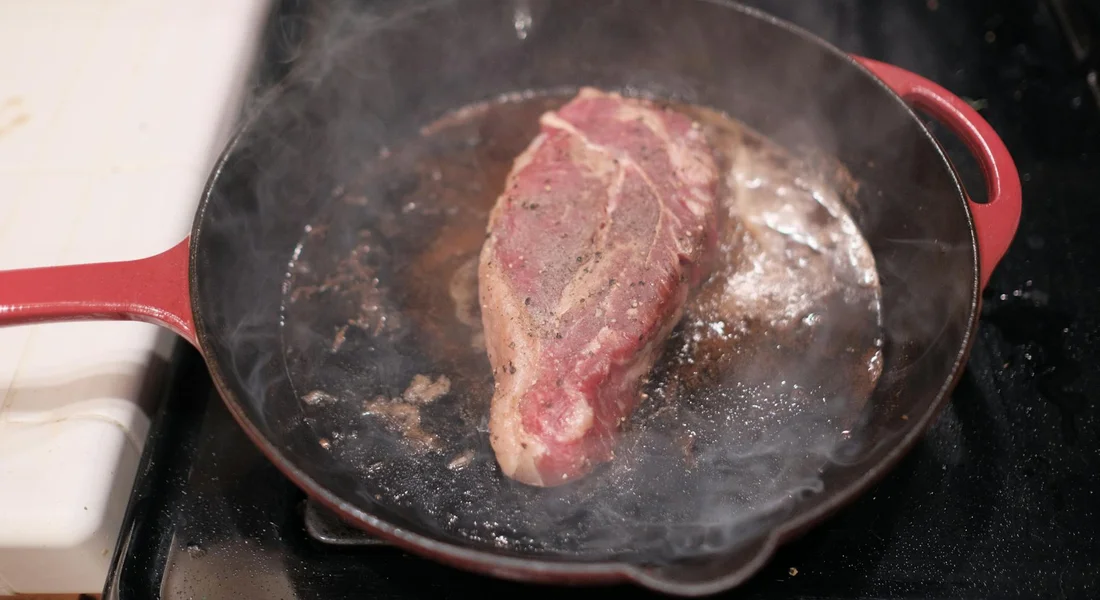
A cold cast iron skillet is a sticky cast iron skillet. Putting a room-temperature steak on a room-temperature pan is the fastest way to glue it right on there. You need that metal hot and ready. I start my pan on medium-low for a solid 5 minutes, then gradually increase the heat to medium-high or high over another 5. This slow preheat avoids hot spots and ensures the entire cooking surface is uniformly ready. To test if your pan is ready, flick a few drops of water onto the surface; if they skitter and dance like tiny mercury beads before evaporating, you’re good to go. That dance means the surface is well above water’s boiling point, which is what you need for a proper sear without sticking.
High-Heat Searing is Safe for a Well-Seasoned Pan
Don’t be afraid of high heat. A properly polymerized seasoning layer is incredibly durable, much tougher than a coat of paint. It can handle the high temperatures needed for a fantastic crust. The real enemy here isn’t heat, it’s thermal shock. Never take a piping hot skillet and run it under cold water, as the sudden temperature change can cause the iron to contract violently and crack. Let the pan cool down on the stove or on a heat-resistant trivet. If your seasoning smokes a little during searing, that’s normal. It’s just the thin layer of oil you added for cooking doing its job.
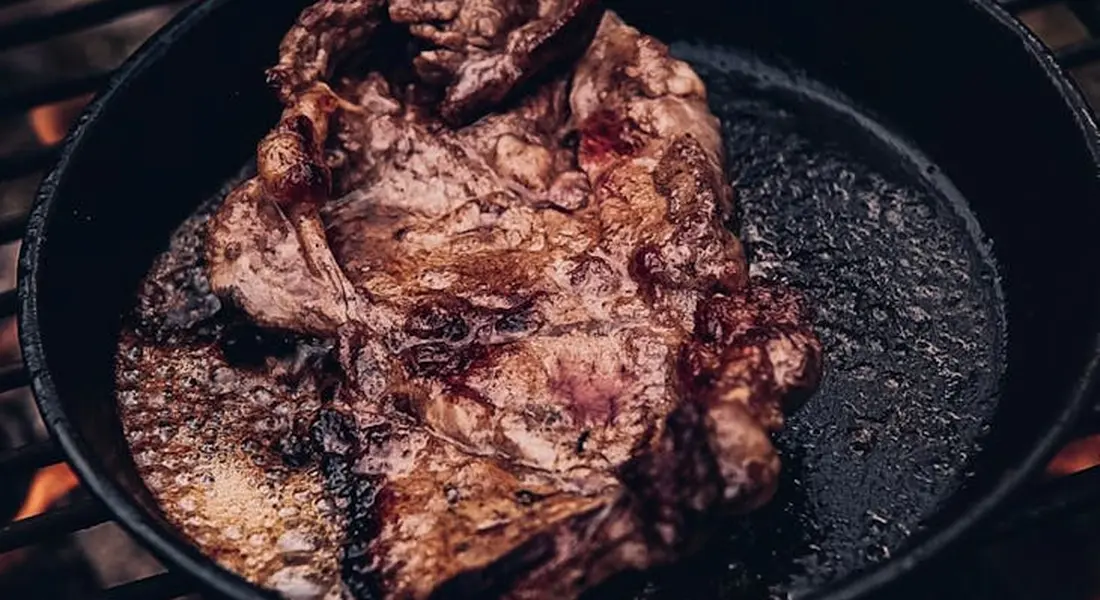
Your Skillet Needs to Rest and Cool After Cooking
When your steak is done, you rest it. Your pan needs the same courtesy. Transfer your steak to a cutting board and just turn off the burner. Leave the skillet right there. It’s full of delicious browned bits called fond and is dangerously hot. This cooling period makes the pan safer to handle and turns stuck-on bits into easier-to-clean, toasted bits. Trying to clean a scorching hot pan is a hazard and often leads to rushed, damaging cleaning methods. Give it 15 to 20 minutes to come down to a warm, manageable temperature.
Proper Post-Steak Cleaning Preserves Your Seasoning
This is where most people get nervous, but it’s simple. Once the pan is warm (not hot), add a cup of warm water. Use a stiff nylon brush or a chainmail scrubber to gently loosen the fond. The warm water helps deglaze the pan without needing harsh abrasives. Avoid soap? Not necessarily. A drop of modern dish soap is fine and won’t hurt your seasoning; it helps cut the grease. The key is to avoid soaking the pan or using steel wool, which can scratch and strip the hard-earned polymerized layers. Rinse, dry immediately with a towel, and you’re almost done.
A Quick Maintenance Wipe Keeps It Ready for Next Time
After towel-drying, I always do one more thing. I put the clean, dry pan back on the warm (turned-off) burner for a minute to evaporate any last moisture. Then, with a paper towel, I apply the tiniest, barely-there film of a high-smoke-point oil like avocado or grapeseed oil. Wipe on the oil, then aggressively wipe it all off again, as if you made a mistake and are trying to remove it. This leaves a microscopic protective layer that prevents rust. Let it cool on the stove, then store it. This 60-second habit means your pan is always prepped for its next masterpiece.
Quick Snapshot: Cast Iron Care for Steak
| Task | Key Goal | Cast Iron Focus & Tip |
|---|---|---|
| Preheating | Prevent sticking, ensure sear | Heat slowly and evenly. Use the water droplet test to confirm the surface is properly hot. |
| Cooking | Manage high heat | Trust your seasoning. Avoid thermal shock by never shocking the hot pan with cold liquid. |
| Cleaning After | Remove fond, preserve seasoning | Use warm water and a gentle scrubber once the pan has cooled to warm. No soaking, no harsh abrasives. |
| Maintenance | Keep pan ready for next time | Apply a whisper-thin coat of oil after every clean and dry. This stops rust and builds seasoning over time. |
Why a Cast Iron Skillet is Your Best Steak Pan
The magic of a great steak isn’t just in the cut. It’s in the sear. A proper sear needs intense, steady heat that won’t drop the moment your cold steak hits the pan. Cast iron’s incredible heat retention provides that consistent, aggressive heat, creating a crust that locks in juices and delivers a restaurant-quality result right on your stovetop. Think of it like a thermal battery. Once it’s hot, it stays hot.
That beautiful crust can be a nightmare if it sticks and tears. This is where your care for the pan pays off. A well-maintained seasoning layer is a polymerized oil surface that becomes naturally non-stick. When your pan is properly hot and oiled, that seasoning helps the steak’s proteins release cleanly, giving you the confidence to flip and serve a perfectly intact piece of meat. It’s the reward for all those times you wiped on a thin coat of oil.
You have options for the final look. A classic flat-bottom skillet gives you an even, all-over sear. My daily driver is a 12-inch flat skillet. A grill pan, with its raised ridges, will give you those classic char marks and lets fat drain slightly. The flat skillet is more versatile for other cooking, while a grill pan is a specialty tool for presentation, but both rely on the same fundamental cast iron principles of heat and seasoning to perform.
Choosing Your Cast Iron Steak Pan
Size matters for two reasons: heat and space. Your skillet should be large enough that your steak isn’t crowded, which steams the meat instead of searing it. It also needs to fit your burner well. A skillet that significantly overhangs your burner will have hot spots and cool spots, leading to an uneven cook. For one or two steaks, a 10 or 12-inch skillet is usually perfect. Remember, a larger, thicker pan holds more heat but also takes longer to preheat.
Always think about the handle. If you plan to finish your steak in the oven-a common technique for thicker cuts-that handle will get as hot as the pan. Choosing a skillet with a substantial, securely attached handle that you can comfortably grip with an oven mitt is a critical safety step for any cast iron steak oven method. Give the handle a wiggle test when you buy it; it should feel like a single, solid piece of iron.
How to Prep Your Skillet for Steak Night
Your cast iron skillet is the ultimate tool for a great steak because it gets incredibly hot and holds that heat. But you have to treat it right to get those results. Proper preheating isn’t just a suggestion; it’s the non-negotiable first step that protects your pan and builds the foundation for a perfect sear.
The Right Way to Preheat: Low and Slow
Never put a cold skillet on high heat. Cast iron heats unevenly if you rush it. This creates stress points that can, over many cycles, lead to warping or cracking. More immediately, it can damage your hard-earned seasoning. I start every single steak, on every single one of my skillets, the same way—especially when you’ve seasoned it for high heat cooking and searing.
- Place your clean, dry skillet on a cold burner.
- Set the burner to the lowest possible setting for 5 minutes. This allows the entire pan to warm up gently.
- Increase the heat to medium for another 5 minutes. You should feel the handle getting warm.
- Finally, turn the heat to medium-high or high for the final 3-5 minutes of preheating. Your pan is now ready for the next test.
This gradual process ensures the entire skillet, not just the center, reaches a stable, high temperature, which is what gives you an even sear without hot spots.
Is It Hot Enough? Two Foolproof Tests
Guessing is how you end up with a steamed steak. You need visual confirmation that your pan is properly searing-hot. Rely on these two simple checks before your steak ever touches the surface.
The Water Bead Test: Flick a few droplets of water onto the skillet’s surface. If the water sizzles and evaporates instantly, it’s not ready. You’re looking for the water to form into tight, quick-moving mercury-like beads that skate around the pan before vanishing. That’s the Leidenfrost effect, and it tells you the surface is above 380°F, which is perfect.
The Oil Shimmer Test: After the water test, add about a tablespoon of a high-smoke-point oil (like avocado, grapeseed, or refined safflower). Tilt the pan to coat it. Within 2-3 seconds, the oil should thin out and start to shimmer, sending faint, wavy lines across the surface. If it immediately smokes, your pan is too hot. If it just pools thickly, it needs more time. A quick shimmer is your green light.
How This Affects Your Cooking Time
You might search for “cast iron steak time” and get a specific number of minutes. A properly preheated skillet reduces the total time your steak needs to cook because it creates an instant, professional-grade sear that locks in juices. The steak spends less time in the pan trying to brown, which means you have more control over the internal doneness. A cold or underheated skillet will add minutes to your cook time as you wait for a weak sear to form, often resulting in an overcooked interior. Think of your preheated skillet as a fast, efficient searing machine. Your job is just to get it to the right starting temperature, and it will handle the rest quickly. This applies not only when cooking steak but also when cooking other things in cast iron, like seafood and vegetables.
Will Cooking Steak Hurt My Skillet’s Seasoning?
I hear this worry all the time. You get your seasoning perfect, that beautiful black gloss, and the thought of blasting it with high heat for a steak is terrifying. Let me be clear: your seasoning is built for this.
Think of a well-seasoned pan like a seasoned grill grate. The high heat from searing a steak is exactly what the polymerized oil layer is designed to withstand. It’s not a delicate non-stick coating; it’s a durable, baked-on shield.
A proper sear won’t strip your seasoning, it reinforces the chemical bonds that make it strong.
True seasoning loss looks like dull, dry, grayish patches on the cooking surface, often after simmering acidic foods for hours or a serious scrubbing. It does not look like a little smoke or the pan getting extremely hot during normal use.
Now, for the big question I see in forums: will that black seasoning get onto my food? No. A stable, polymerized layer is chemically bonded to the iron. It’s not a coating of loose carbon or grease. Your steak sears on the seasoning, it doesn’t scrape it off. If you see black specks, that’s usually burnt food residue or carbon from incomplete cleaning, not your base seasoning flaking away.
Common Mistakes and How to Avoid Them
Protecting your pan is more about technique than avoiding heat. Here are the errors I see most often and how to fix them.
- Mistake: Adding oil to a cold pan, then cranking the heat.
Fix: Let your dry pan get hot for a few minutes first, then add your high-smoke-point oil (like avocado or grapeseed). This prevents the oil from soaking into the pores and creating sticky spots, and it gives you a better sear. - Mistake: Using metal tongs to aggressively flip or move the steak constantly.
Fix: Let the steak sit undisturbed for a full 2-3 minutes to build a crust. When you flip, use a gentle touch. I prefer sturdy fish spatulas or nylon-tipped tongs to prevent gouging the surface. - Mistake: Deglazing a screaming hot pan with a cold liquid.
Fix: Always remove the pan from the heat source for 60 seconds before adding wine, broth, or water. A sudden, extreme temperature shock is one of the few things that can stress the metal and the seasoning bond. - Mistake: Letting the pan cool with food residue and grease baked onto it.
Fix: Clean it while it’s still warm (not scalding). Warm water and a gentle scrub brush or chainmail cloth make quick work of fond and fats before they cement into a sticky, hard mess.
Treat your skillet right during the cook, and the clean-up becomes a simple, quick task that preserves your hard-earned patina. My oldest vintage skillet has seen hundreds of steaks and its seasoning is only more glassy and reliable for it. Proper maintenance is key to keeping it in excellent shape.
How to Clean Your Skillet After a Steak
Let your pan cool down a bit after cooking. You don’t want it scorching hot, but warm is perfect for cleaning. A slightly warm pan makes the cleanup process much easier and more effective.
Add a small amount of hot tap water to the warm skillet. You’ll hear a sizzle, which is what you want. Use a flat-edged wooden or silicone spatula to gently scrape the bottom of the pan. This process is called deglazing, and it lifts all those flavorful, browned bits (the fond) off the surface so you can wipe them away. The hot water loosens everything, making stubborn, stuck-on food a non-issue.
Pour out the dirty water. Now, give the pan a gentle scrub with a stiff nylon brush or a handful of coarse salt. The salt acts as a gentle abrasive. Rinse it thoroughly with warm water. You can use a tiny bit of modern dish soap here without fear. It won’t harm your seasoning. The old rule about no soap is outdated.
Dry the skillet immediately and completely with a towel. To be absolutely sure, place it on a low burner on your stove for a minute or two to evaporate any last trace of moisture. Finish by applying the lightest, almost imperceptible coat of oil to the cooking surface while it’s still warm. This is your maintenance step.
When a Steak Leaves a “Dead” or Sticky Residue
Sometimes after a high-heat sear, you might find your pan feels sticky or tacky, even after cleaning. This isn’t a ruined pan. It’s what I call a “dead” layer. It happens when oil polymerizes incompletely, leaving behind a gummy, carbonized residue instead of a hard, slick seasoning layer.
To fix this, you need to remove that weak layer. Scrub the pan thoroughly with hot water, soap, and that stiff nylon brush or salt. You might need a bit more elbow grease. If the sticky spot persists, a chainmail scrubber used with light pressure can dislodge it without damaging the good seasoning underneath. Your goal is to remove only the tacky residue and leave the hard, black seasoning intact.
Once the pan is clean, dry, and completely free of sticky spots, you have a blank canvas. This is the perfect time for a maintenance seasoning round. Apply the thinnest possible layer of your preferred oil and bake the pan upside-down in a 450°F oven for one hour. Let it cool in the oven. This will bake a fresh, hard, and slick layer right over the solid foundation you already have.
Keeping Your Pan in Steakhouse Shape
Your pan just performed a high-heat miracle. Now, it needs your care. How you clean and store your skillet directly determines how it will perform for your next sear. This isn’t just cleaning, it’s maintenance that builds your pan’s future.
Dry It Like You Mean It
Water is the number one threat to your cast iron. Leaving even a little moisture on the surface invites flash rust, which is exactly what it sounds like. It can appear almost instantly as a reddish film.
I always do a two-step dry on my 10-inch skillet. First, a thorough towel dry right after washing. Then, I place it on a still-warm stove burner for a few minutes. You can also put it in a low 200°F oven for 10 minutes. Applying gentle heat guarantees every last bit of water evaporates, stopping rust before it can start.
The Secret is in the Wipe-Off
Once your pan is completely dry and cool enough to handle, it’s time for a protective coat. This is where most people go wrong by using too much oil.
Pour about a teaspoon of a high-smoke point oil (like grapeseed or avocado) into the pan. Use a paper towel to spread it over every surface, inside and out. Then, take a fresh, clean paper towel and aggressively wipe the entire pan again. Your goal is to buff off all the oil you just applied, leaving only a microscopic, invisible film behind. If the pan looks or feels oily, you used too much.
I think of it like polishing a car with wax. You put the wax on, then you buff it off to a shine. The leftover thin layer is what protects. A sticky, oily pan will attract dust and become gummy, not glossy.
Building Resilience for the Next Sizzle
This simple routine does more than prevent rust. That micro-thin layer of oil slowly bonds to the existing seasoning in your dry storage cupboard. It undergoes a very slow polymerization, reinforcing your pan’s non-stick surface.
Every time you clean, dry, and apply this whisper-thin coat, you are subtly strengthening the pan. This consistent care builds a resilient foundation, so your skillet is always ready to handle the brutal, direct heat needed for a perfect crust. The next time you preheat it for a steak, you’re not starting from scratch, you’re building on a well-maintained base that gets better with every use.
Fixing Common Post-Steak Skillet Problems
That perfectly seared steak is a triumph, but sometimes your skillet pays the price. Here’s how to diagnose and fix the most common issues that show up after a high-heat cook.
Food Sticking to the Cooking Surface
If bits of steak are welded to the pan, the heat wasn’t ready. Cast iron needs time to get evenly hot, like a campfire needing to turn to coals. Sticking means you cooked on hot spots instead of a consistent cooking surface.
To fix it, scrub the stuck bits with coarse salt and a little oil, then give the pan a quick stovetop seasoning to reinforce the surface.
A Sticky, Gummy Residue
You might feel a tacky film after washing. This is almost always from oil, not food. It happens when you applied too much oil for maintenance or didn’t heat the pan long enough after oiling it. The oil polymerized partway, leaving a sticky varnish.
Scrub the residue off with warm, soapy water and a brush, then heat the dry pan on the stove for a few minutes to fully dry it before putting it away.
New Dull or Light Spots
You might see hazy patches where the dark seasoning looks faded. This is common after searing. It’s often just a thin layer of cooked-on fat and proteins, not damaged seasoning. Think of it like smoke residue on a grill grate-it’s superficial.
Give the pan a good clean. If the spot feels rough, a light scrub with a chainmail scrubber will level it out. The dark color will return with your next cook or a quick stovetop seasoning.
Your Post-Steak Skillet Repair Guide
| Problem You See | Likely Maintenance Cause | Corrective Action |
| Steak bits stuck fast | Insufficient or uneven preheating | Clean, then apply a stovetop seasoning layer. |
| Tacky, greasy feel | Too much oil left on pan after cleaning | Wash with soap, dry thoroughly with heat. |
| Cloudy, light patches | Superficial protein/fat film from high heat | Clean normally; color will even out with use. |
| Flaking or bare metal | Severe thermal shock or layered residue failure | Consider a full oven re-season (see below). |
Spotting and Solving Seasoning Damage
It’s key to know the difference between a damaged seasoning layer and normal, varied patina. A healthy pan isn’t one uniform black mirror. It has lighter and darker areas from cooking.
True seasoning failure shows as flaking, where you can peel up a layer like old paint, or as persistent rust spots that return after cleaning. Normal patina might look splotchy but feels smooth and non-sticky to the touch.
For severe flaking or widespread rust, a full oven re-season is the reliable fix. This is your last resort, but it’s a straightforward reset button for your pan.
- Strip the old, failed seasoning completely using a lye-based method or electrolysis. I never recommend self-cleaning ovens for this, as the extreme heat can warp pans.
- Once down to bare, gray iron, wash, dry, and apply the thinnest possible layer of a high-smoke-point oil (like grapeseed or flaxseed).
- Bake it upside-down in a hot oven (typically 450-500°F) for an hour. Let it cool in the oven. Repeat this 2-3 times to build a strong new foundation.
My own daily skillet went through this process years ago after I made the classic mistake of letting it sit wet. It’s now more resilient than ever, proof that a little dedicated repair work pays off for decades.
Tools That Help Your Skillet and Your Steak
Getting a perfect crust on a steak isn’t just about timing, it’s about maximizing contact between the meat and your hot pan. The right tools bridge the gap between a good sear and a great one, all while keeping your skillet’s seasoning intact.
The Cast Iron Steak Press: Flattening the Learning Curve
If your steaks sometimes curl or have pale, uneven spots, a steak press (or weight) can be a game-changer. I keep a simple cast iron press in my kitchen drawer for this very reason.
Its main job is to gently hold the entire surface of the steak firmly against the skillet. This guarantees an even, full sear and eliminates those frustrating air gaps. For thinner cuts, it can help speed up cooking slightly by improving thermal transfer.
A press solves the problem of uneven searing by ensuring constant, full contact with the pan’s cooking surface.
But it has two downsides. First, a cold cast iron press will suck heat right out of your pan when you place it on the steak. Always pre-heat your press in the oven or on a separate burner while your skillet gets hot. Cast iron heat retention is what makes that hot-start possible, helping you sear evenly. If it cools too quickly, your cooking suffers. Second, it’s a single-purpose tool that takes up space. A heavy, smaller skillet or a foil-wrapped brick can do the same job in a pinch.
Stop Guessing: Why an Infrared Thermometer is Non-Negotiable
One of the biggest mistakes in cast iron cooking is using a pan that’s either not hot enough or frighteningly too hot. Your eyes and flicked water droplets are poor judges. An inexpensive infrared thermometer removes all doubt when used in conjunction with proper cooking techniques.
Point it at the center of your dry, pre-heated skillet to get an instant surface temperature reading. For searing steak, you’re aiming for a range between 400°F and 450°F. Below 400°F, you’ll steam the meat instead of sear it. Far above 500°F, you risk damaging your pan’s polymerized seasoning layer. Finding the right temperature is just one part of a successful sear.
Mastering pan temperature is the foundation of good cast iron cooking, and an infrared thermometer gives you that control instantly.
Think of it as a speedometer for your skillet. You wouldn’t drive blindfolded, so don’t cook without knowing your pan’s real temperature. This tool is arguably more important for your seasoning’s health than any special oil.
Choosing Utensils That Respect Your Seasoning
What you use to move and flip your steak matters just as much as the pan itself. The goal is to get under that crust without scraping off the hard-earned seasoning underneath it.
- Thin Metal Fish Spatula: This is my personal favorite for steaks. Its thin, beveled edge slides perfectly underneath the meat to release it cleanly from the skillet’s surface. It acts like a putty knife, lifting the steak without gouging the seasoning.
- Sturdy Wooden Spatula: A classic, gentle choice. Wood is naturally soft and will not scratch or chip the seasoning. It’s perfect for pressing and moving, though it might not be thin enough to cleanly release a well-seared steak without some coaxing.
- High-Temp Silicone: Utensils with silicone edges are very safe for your seasoning. Look for ones rated for at least 450°F. They are flexible, which can be a drawback when trying to forcefully lift a heavy steak, but they are foolproof for gentle turning.
Avoid stiff, thick-edged metal spatulas. They are like using a shovel on a hardwood floor, and they can scrape and chip your seasoning over time. A fish spatula, in contrast, is like a painter’s tool, designed to get under the surface without damage.
Quick Answers
Does using a cast iron steak press hurt my pan’s seasoning?
A cold press can shock the pan’s heat and cause sticking. Always preheat your press alongside your skillet. When used hot, it simply applies even pressure and will not damage a well-polymerized seasoning layer.
Is finishing my steak in the oven safe for my cast iron skillet?
Absolutely, provided your skillet’s handle is oven-safe. The dry, consistent heat of an oven is actually gentler on your seasoning than the intense, direct heat of the stovetop sear. Just remember to use an oven mitt when handling.
How can I tell if my pan is sticky from steak residue or if the seasoning is damaged?
A sticky feel indicates soft, carbonized grease or excess oil that wasn’t fully polymerized. True seasoning damage feels rough or flaky, revealing dry, grayish iron. Scrub the sticky layer off with hot, soapy water; a damaged layer may require re-seasoning.
Preserving Your Skillet’s Patina After Cooking
To cook the perfect steak, always preheat your cast iron skillet slowly and thoroughly, letting the heat build evenly for a proper sear without damaging the seasoning. Once you’re done, let the pan cool slightly, then clean it gently and apply a thin coat of oil to keep the non-stick surface intact for next time. If you want to ensure your cast iron lasts for years, explore our detailed guides on seasoning maintenance and rust prevention.
Expert Resources and Citations
- Perfect Cast Iron Steak (Herb Butter Basted!)
- The Perfect Cast Iron Steak • The Crumby Kitchen
- Perfect Cast Iron Steak | America’s Test Kitchen
- save this video to make the perfect cast iron steak 🥩
- r/Cooking on Reddit: How do I cook the best steak on a cast iron skillet?
- Mouth-Watering, Easy Cast Iron Steak – FIXED on FRESH
A material science expert by profession, Joseph is also an avid cook. He combines his 10+ years expertise in material science and metallurgy with his passion for cast iron cookware to bring you best hands on advice. His expertise ranges from types of cast iron cookware to best seasoning tips as well as restoration of vintage cast iron utensils. Joe is here to help you solve all your cast iron cookware queries and questions.